Bonus Module: Lenses
This week’s Distance Learning theme is optics, light, and the electromagnetic spectrum.
On Wednesday, we looked at how refraction impacts the way we see an object in water. This module builds on that activity, by using a bowl full of water & a few household props to further explore the properties of lenses. Stick to just the hands-on activity for younger learners, or bring in written content for middle & high school physics-lovers!
Introduction
A lens is a curved piece of glass or plastic designed to refract (bend) light in a specific way. Lenses are used in glasses and contacts to help correct vision, and they help cameras to take photographs. Lenses are used in microscopes to view very small items, and in telescopes to view things that are far away.
What makes a lens different from any other transparent object is its ability to focus light. While a prism refracts light without focusing, a lens is designed to bend light rays to a specific focal point, where items appear clear and in-focus (not blurry ).
image credit: wikimedia commons
Lenses come in two main shapes: convex and concave. On a convex lens, the center is thicker than the edges—so that the lens bulges outward in the middle. On a concave lens, the center is thinner than the edges—so that the lens bows inward at the center. (Helpful hint: remember the difference by thinking of the phrase “caving in”—a conCAVE lens goes IN at its middle.)
A convex lens is also called a converging lens, because it causes light to refract in such a way that it all ends up, or converges, at a single focal point. The focal length is the distance from the center of the lens to the focal point, and the principal axis is an imaginary straight line running through the center of the lens to the focal point. Another name for this type of lens is a positive lens.
basic function of a convex (converging) lens (image credit: https://physics.info/lenses/)
A concave lens is also called a diverging lens because it causes light rays from a specific focal point to diverge, or spread out. Another name for this type of lens is a negative lens.
basic function of a concave (diverging) lens (image credit: https://physics.info/lenses/)
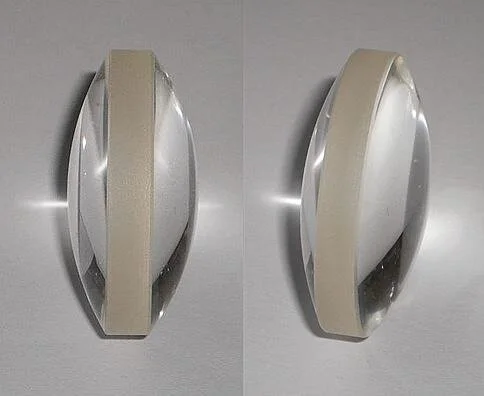
glass biconvex lens (image credit: wikimedia commons/Tamasflex)
Converging lenses are further categorized by their specific shape, and include include biconvex (curved outward on both sides), plano-convex (flat on one side and curved outward on the other side), and convex meniscus (curved inward on one side and outward on the other side more strongly).
Diverging lenses include those that are biconcave (curved inward on both sides), plano-concave (flat on one side and curved inward on the other side), and concave meniscus (curved inward on one side and curved outward on the other side less strongly. (See graphic.)

image credit: https://physics.info/lenses/

Simple lenses like these can't form very sharp images, so engineers often combine lenses to make sophisticated optical equipment. Refracting telescopes and compound microscopes use combinations of multiple lenses to get focused images to our eyes.
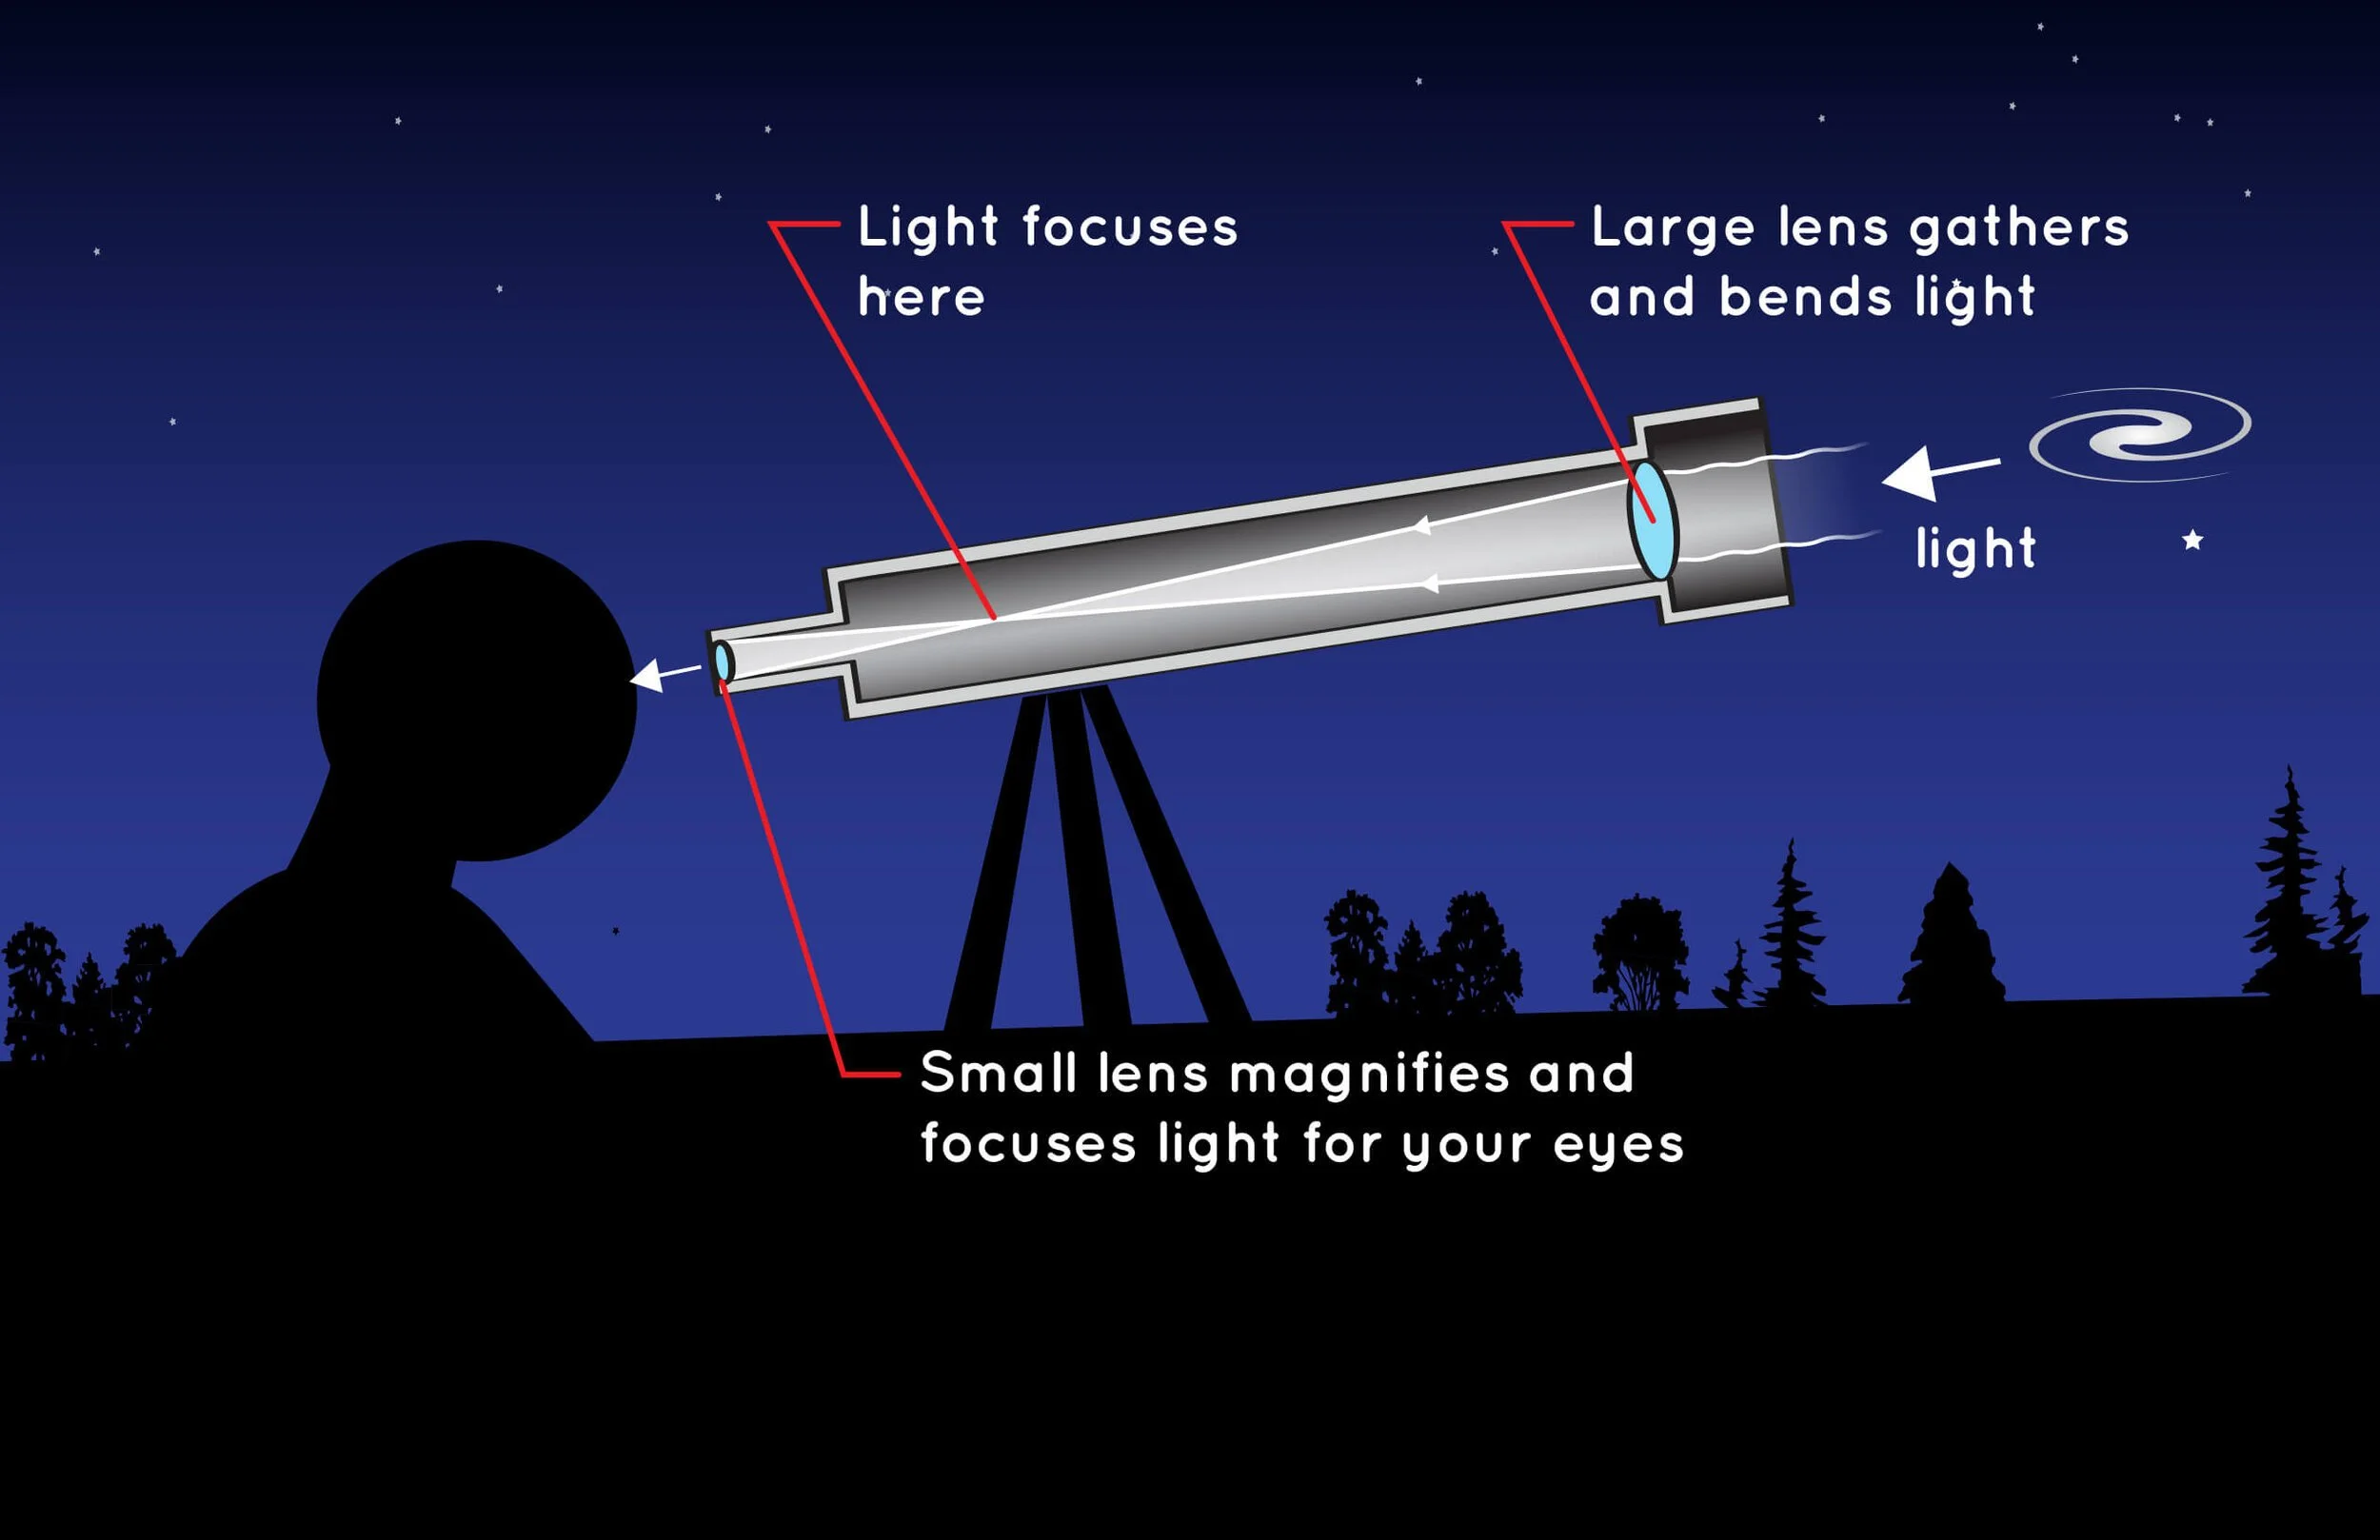
image credit: spaceplace.nasa.gov
image credit: www.science.howstuffworks.com
In today’s hands-on activity, we’ll use a bowl full of water, which acts like a simple biconvex converging lens.
Hands-On Activity: Part 1
Materials
Spherical(ish) water container—This can be a round-bottom laboratory flask, a fishbowl, or (if you need to improvise, like me) a wine glass. The only real requirement is that the body is rounded, so that when the vessel is filled with water, it can act like a convex lens. A straight-sided vessel—like a tall drinking glass or a mason jar—doesn’t have the curvature needed to impact light the way we want it to.
Light source—This can be a candle, bright flashlight, or a lamp with the shade removed to reveal the bare bulb. Any source of bright light that is not sunlight will work. It’s slightly more fun to use a candle or light bulb (vs. a flashlight) because you can see it turn upside-down (more on this later). Make sure to use adult supervision when working with candles and flames!
Piece of white paper, to use as a background “projection screen”
Darkened room


Procedure
Fill your round glass or bowl with water. When light passes from one medium to another, it changes speed and refracts. So, when light passes from the air in the room to the water in the glass—or vice versa—it will bend. You can see that a fishbowl or wine glass bulges outward at the center: for this reason, a rounded vessel of water acts like a convex lens.
Set up your project in a darkened room, so that your candle/flashlight/bulb is the only light source.
Prop or tape the piece of white paper so that it stands upright against a wall or a piece of furniture. This is your viewing platform.
Set up your light source anywhere between you and the viewing platform.
Put the lens (glass or bowl of water) anywhere between the light source and the viewing platform.
(So, the final order of components should be: you, the light source, the lens, and finally the viewing platform—see photos.)
Move the light source closer to, and then farther away from, the lens. What happens to the appearance of the light on your viewing platform?
Try the above step with the lens positioned very close to the viewing platform. Now try it with the lens at a greater distance from the viewing platform. How does this impact what you see?
What’s Happening?
The lens serves to focus light: when the parallel rays from your light source pass through the lens, the refracted rays converge at the focal point. You should notice that as the distance increases between your light source and lens (that is, when you move the light away from the bowl of water), the light on the viewing platform becomes crisper and more concentrated on a smaller area.
If you’re using a bulb or candle, you may have noticed that the image you see on the viewing platform is also upside-down at certain points! (You can see this in our video example.) We’ll explain why that happens in Part 2 of this Hands-On Activity.
Weird Fact: Glass bowls are so good at focusing light, there have been recorded incidents of household items unintentionally acting as lenses and starting house fires! It is not unheard of for a fishbowl or glass doorknob to capture ambient sunlight and create a strong enough focal point to start fires. This is why you should never keep a fishbowl in the windowsill (besides not wanting to heat up the water too much for your fish).
Hands-On Activity: Part 2


Materials
Spherical(ish) water container—see Part 1 for details
Light source (you can use a light bulb if you have it handy from Part 1 of the activity, but a candle will probably not be bright enough for this part. I used a flashlight.)
Darkened room
Something visually simple that you want to optically manipulate—this could be a postcard, photograph, page of the newspaper, sketch on a piece of paper, or even a small freestanding object. I used the cover of a book, because I thought the artwork was appropriate for demonstrating the different optical effects of lenses. Whatever you choose for your visual prop, I’ll call this part of the project the “object” in my instructions.
Procedure
Fill your bowl with water
Set up in the darkened room, with the lens between the object and light source.
(So, the final order of components should be: you, light source, lens, object)
Position yourself so that your line of sight is along the principal axis—so that you’re looking at the object THROUGH the lens (but make sure you’re behind the light source, or your body will block light from reaching the lens!)
Play with the distances between the object, light source, and lens…What do you see when the lens is very close to the object, but far away from the light source? Move the lens back, so that it is evenly spaced between the light source and the object. How does this impact the way the image appears? Now try it with the lens located far from the object, but close to the light source.
What’s Happening?
When light passes through a convex/converging lens, the image that is formed changes, depending on the relative positions of the lens and the object being viewed—see this graphic from Encyclopaedia Britannica:
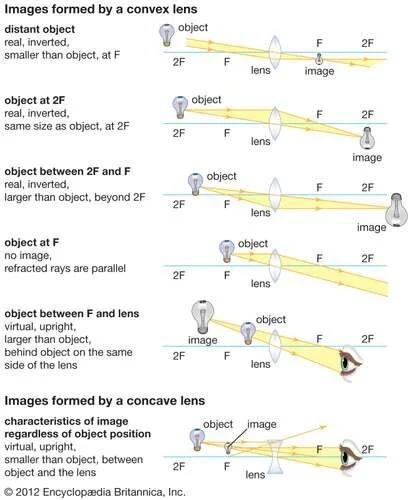
image credit: Encyclopædia Britannica, Inc.
Depending on how you positioned the materials for this activity, the image that you saw may have appeared magnified (larger), diminished (smaller), or inverted (flipped on both the X and Y axis, so that it looks upside-down and backwards). Additionally, you may have been seeing a real image located where the light converged, or a virtual image where the light only appeared to converge (which happens when the object being viewed is located inside the focal length of the lens). In fact, the image may have exhibited a combination of these factors—for example: real, inverted, and magnified; real, inverted, and diminished; or virtual magnified and upright. Again, see the graphic from Encyclopaedia Britannica for all the different combinations and how they relate to the physical positions of the components.


Ray diagrams like this one trace the path that refracted light takes. This helps us to understand how the relative positions of an object and light source will impact the resulting image. Visit this website for much more information on ray diagrams, from Georgia State University.

image credit: http://hyperphysics.phy-astr.gsu.edu/
Finally, this video shows how to draw a ray diagram, and discusses some of the optical effects that you may have experienced with your homemade simple lens: