At-home STEM Activities: Science of Animation and DIY Zoetrope

Still from Walt Disney’s Steamboat Willie (1928). Image via VirginiaFilmFestival.org
Since the turn of the twentieth century, audiences have been amazed by the technical and artistic marvel that is motion pictures. The very first movies were live-action, but it wasn’t long until artists started bringing their drawings to life in animated shorts and films. But how are they able to do that?
When shown at the proper speed, this series of images sets the characters into action in Pixar’s The Incredibles. Image via sciencebehindpixar.org.
It’s really based on our brains! When things are moving in front of us, our eyes and brains can only process about 10 to 12 separate images per second. So if things are moving too fast, like when you spin around in a circle or when you look out a side window of a moving car, you can’t see things clearly; it just looks like a blur. In animation, though, we see the images at just the right speed. What we’re seeing in a cartoon is an optical illusion—by showing images at a speed of 10-12 frames per second with a slightly different picture in each frame, it appears as if the images are walking and talking, when, actually, it’s just a series of still pictures.

Storyboard images from Japanese animation house studio Ghibli, which predominantly uses traditional hand-drawn animation. Image via commons.marymount.edu.
Prior to the 1990s, most animation was hand drawn. This technique required a lot of people; for the first animated feature film, Disney’s Snow White and the Seven Dwarfs, for example, over 750 artists completed more than 2 million sketches for the movie, with the actual film comprising of around 250,000 drawings. With more modern technology, though, movie-makers were able to develop new techniques for making animated films—mainly, computer animation.
Today, many animated feature films are created with computers, which use a fascinating blend of art and science to put still images in motion. In animation studios around the world, thousands of artists work designing characters and creating stories, but to actually bring these characters to life, a lot of math, physics, and computer science is needed. Check out the video below to see all the math and science that went into designing Merida’s hair for Pixar’s Brave:
In computer animation, math and science are needed for more than just characters’ hair. Animators need to understand all sorts of science—like anatomy, optics, and physics—to create characters and worlds for them to move in. You can read more about how Pixar uses science (and try your hand at some of the aspects of computer animation) in the Boston Museum of Science’s virtual version of their exhibit The Science Behind Pixar.

CLICK HERE TO VIEW THE EXHIBIT
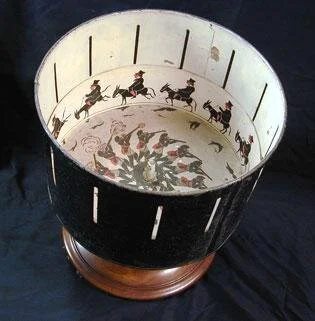
Image via artofplay.com
Zoetrope in motion
While animated films have been around for over 100 years, people have been finding ways to create moving pictures through optical illusions for even longer. One example of this is a zoetrope (pronounced: zo-ee-trope). The zoetrope was a popular toy in the mid-1800s comprised of a strip of images placed along the inside wall of a spinning drum. As the drum turns, the viewer looks through the slits. The solid parts of the drum create a break for the viewer’s eyes, stopping the images from blurring together and creating the illusion of motion. The zoetrope led to other animation devices, like the praxinoscope (a similar device where the images are viewed on a central mirror, rather than through cuts on the drum) and flip books.
Now that we know a little more about animation, let’s create our own moving pictures by making a zoetrope!
DIY Zoetrope
Materials:
Cylindrical cardboard container (like one used for oatmeal)—in our example, we are using a container that is 12.5 inches in circumference, so the templates and instructions are based on this measurement
Craft knife
Scissors
Tape
Zoetrope Templates, printed on normal printer paper
Black paint
Paint brush
Drawing material of your choice (pencil, pens, markers, colored pencils, etc.)
Thumbtack
Pencil with eraser
Instructions:
1. Cut out the template from the first page of the “Zoetrope Templates” from above. Wrap the template around the bottom of the cardboard container, matching up the pieces so that there are 1.25 inches between each black line, and tape to hold in place.
2. Using the craft knife (and with adult supervision!), cut off the top of the cardboard container, leaving the bottom that’s wrapped with the template. Then, completely cut out each black line, as below, creating notches in the container.
3. Paint the inside and the outside of the container with the black paint.
4. Now we’ll make the pictures that will go inside our zoetrope to create our animation. Cut out two pieces from one section of the second page of the Zoetrope Templates file, and tape together, making a strip of paper that is 12.5 inches.
5. Draw your design—between each frame of your animation, make a small change. This will allow for a smooth motion when you spin your zoetrope.
6. Place your animation strip inside your zoetrope.
7. Stick the thumbtack through the center of the bottom of your zoetrope, into the eraser of the pencil.
8. Your zoetrope is complete! Spin the pencil in your hand to turn the zoetrope, and look through the notches to watch your animation come to life.